Mikrotik
Generalmente usuario
adminsin contraseña.Se usa puerto de consola serial a 115200 baudios
Modelo 230: 9600 baudios
Para ayuda ir poniendo
?.Si se pone un comando incompleto se entra a un sub-menu, para ir volviendo atrás poner
...
Mostrar cosas:
ip address print
ip route print

ipv6 address print
ipv6 route print

interface print
Habilitar o deshabilitar interfaz:
interface print
interface enable numbers={numero_interfaz}
interface disable numbers={numero_interfaz}
Agregar IP:
ip address add interface=eth0 address=192.168.1.1/24
ip address remove numbers=1

ipv6 address add interface=eth0 address=2001:AA::2/64 advertise=no
ipv6 address remove numbers=1
El advertise al agregar una IPv6 indica si se habilita RA en esa interfaz.
El intervalo por defecto es bastante lento y puede parecer que el RA no anda.
Agregar rutas:
ip route add dst-address=0.0.0.0/0 gateway=192.168.1.1
ip route remove numbers=1

ipv6 route add dst-address=::/0 gateway=2001:A::1/64
ipv6 route remove numbers=1
Configurar DNS:
ip dns set servers=8.8.8.8
Crear loopback y dar IP:
interface bridge add name=loopback0
ip address add interface=loopback0 address=1.1.1.1
Ver y habilitar paquetes:
system package print
system package enable numbers={numero paquete}
system reboot
Reiniciar configuración:
system reset-configuration
NAT
ip firewall nat add chain=srcnat action=masquerade out-interface={interfaz salida}
Servidor DHCP
ip pool add name=dhcppool ranges=10.0.0.10-10.0.0.50

ip dhcp-server network add address=10.0.0.0/8 gateway=10.0.0.1 dns-server=8.8.8.8

ip dhcp-server add name=dhcpserver interface=ether2 address-pool=dhcppool disabled=no
Servidor PPPoE
Poner NAT:
ip firewall nat add chain=srcnat action=masquerade out-interface={interfaz salida}
Configurar rango:
ip pool add name={nombre pool} ranges={primera IP} {ultima IP}
Agregar perfil cliente:
ppp profile add name={nombre perfil} local-address {IP placa interna}
remote-address={nombre pool} dns-server={IP DNS} rate-limit=1024kbps
Cargar clientes:
ppp secret add name={nombre usuario} password={pass usuario} service=pppoe
profile={nombre perfil}
Asignar servicio a interfaz:
interface pppoe-server server add service-name={nombre servidor}
interface={interfaz interna} default-profile={nombre perfil} disabled=no
Ver problemas:
log print
IPv6
Puede que el paquete ipv6 esté deshabilitado, ver arriba cómo se hace para
habilitarlo.
Para cambiar el intervalo, imprimir la lista de RA activos y configurar el intervalo. El intervalo tiene un valor mínimo y uno máximo:
ipv6 nd print
ipv6 nd set ra-interval=10s-20s numbers=0
6to4
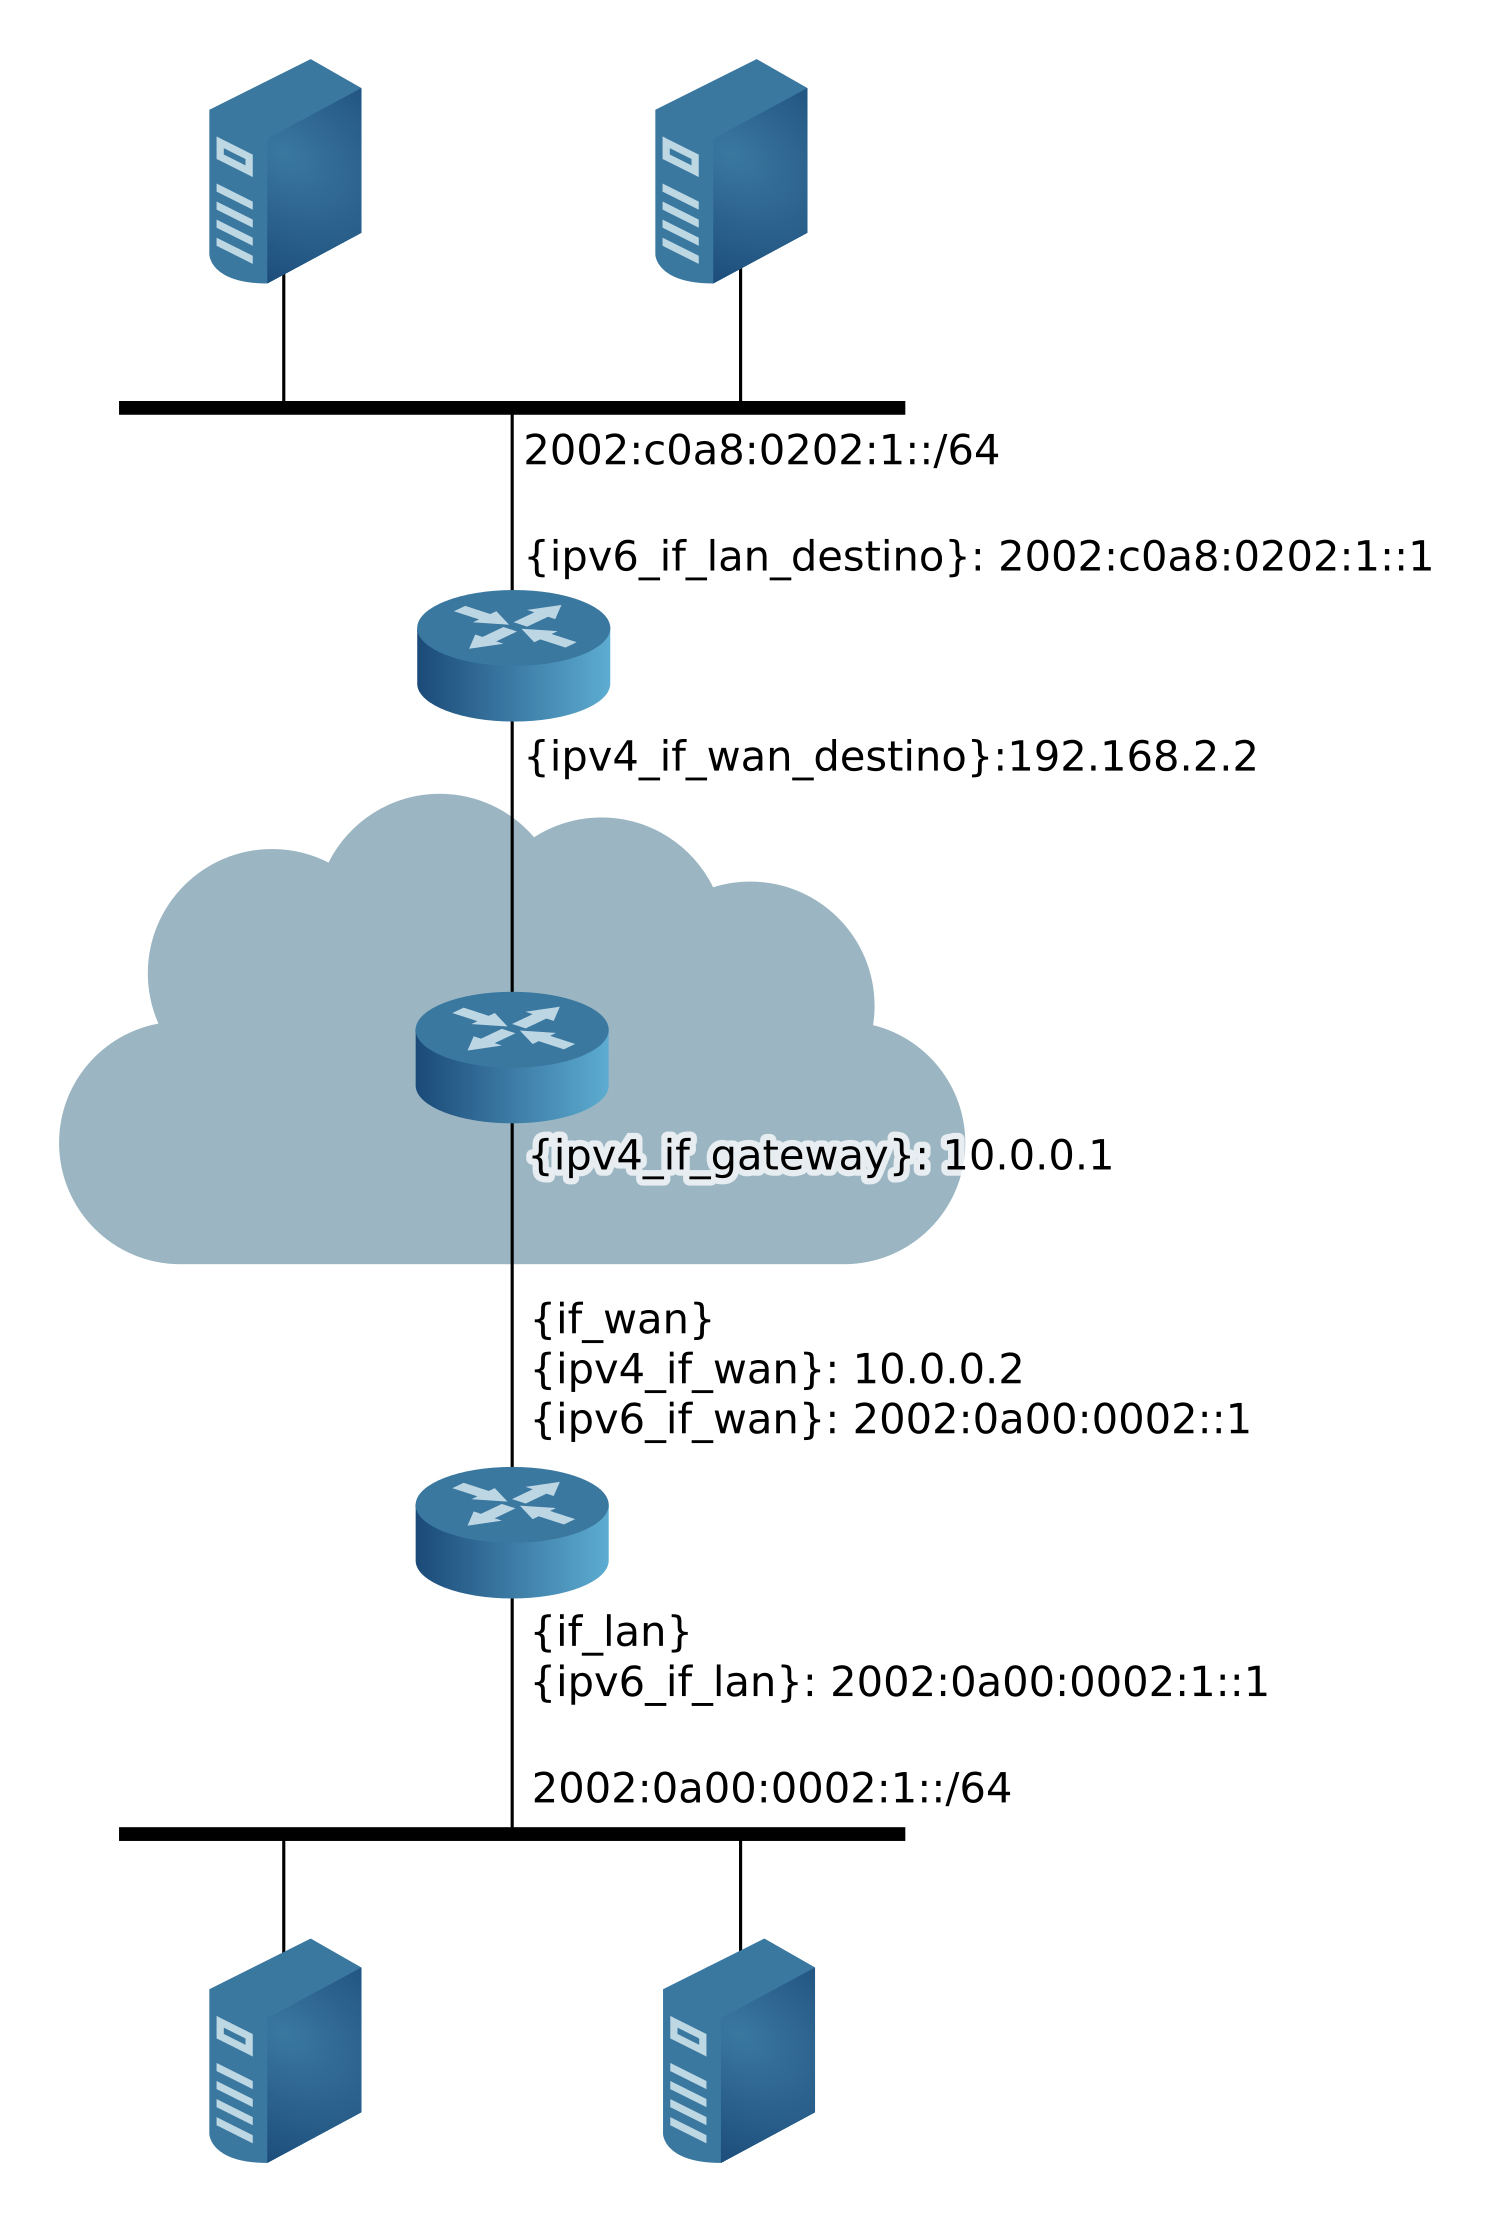
Primero agregar la IPv4 de WAN y agregar ruta por defecto para el gateway ipv4:
ip address add interface={if_wan} address={ipv4_if_wan}/{ipv4_mask_if_wan}
ip route add dst-address=0.0.0.0/0 gateway={ipv4_if_gw}
Configurar la interface 6to4:
interface 6to4 add mtu=1280 name={nombre_tunel} local-address={ipv4_if_wan} remote-address=unspecified disabled=no
Asociar la ipv6 calculada previamente a la interfaz creada:
ipv6 address add address={ipv6_if_wan}/64 interface={nombre_tunel}
Agregar una ruta que indica que el tráfico a IPv6 2002 se debe enviar por el
túnel:
ipv6 route add dst-address=2000::/3 gateway={nombre_tunel}
Configurar la interfaz con IPv6 que da a la LAN, a diferencia de Cisco no tiene
que estar en una subred, la {ipv6_if_lan} puede ser igual a
{ipv6_if_wan}. Pero es mejor ponerlo en una subred:
ipv6 address add address={ipv6_if_lan}/64 interface={if_lan} advertise=yes disabled=no
RIP
RIPv2
Por defecto es V2. Nunca probé usar V1.
Agregar redes en donde trabajar y redes a publicar:
routing rip network add network={red}/{mascara}
Pasivar interfaces:
routing rip interface add passive=yes interface={interfaz}
RIPng
Agregar redes en donde trabajar y redes a publicar:
routing ripng interface add interface={interfaz}
Cambiar tiempo de publicación en segundos (agregar s al final):
routing ripng set update-timer={tiempo}s
Hay más opciones a configurar, se muestran con:
routing ripng print
Para distribuir otros rutas:
routing ripng set distribute-default={never|always|if-installed}
routing ripng set redistribute-static={yes|no}
routing ripng set redistribute-bgp={yes|no}
routing ripng set redistribute-ospf={yes|no}
OSPF
OSPFv2
Crear loopback y dar IP:
interface bridge add name=loopback0
ip address add interface=loopback0 address={ip}/{mascara}
Crear instancia OSPF (no sé como se relaciona el nombre con los números usados en Cisco):
routing ospf instance add name=default
Agregar redes en donde trabajar y redes a publicar:
routing ospf network add network={red}/{mascara} area={area}
Pasivar interfaces:
routing ospf interface add interface={interfaz} passive=yes
routing ospf interface add interface=loopback0 passive=yes
OSPFv3
Configurar OSPFv3, no sé por qué los comandos son tan raros. Se debe dar una IPv4 cualquiera como ID para este router:
routing ospf-v3 instance set default redistribute-connected=as-type-1 router-id={ipv4_id}
routing ospf-v3 area set {area} instance=default
Agregar redes en donde trabajar:
routing ospf-v3 interface add interface={interfaz} area={area} network-type=broadcast
Agregar redes pasivas:
routing ospf-v3 interface add interface={interfaz} area={area} network-type=broadcast passive=yes